
Upgrading memory on an HP 14-cf0006dx laptop (as well as HP 14-df0053od, model 14-cf0006dx, 14-ck0065st, etc. etc.)
Memory type: DDR4-2400 SODIMM 8GB
Difficulty: medium
Tools: Determination, gentle firmness, pry tool or expendable credit card, small screwdriver (approx. PH0 size).
I just purchased the HP model 14-cf0006dx laptop due to an offer I couldn’t refuse. Recently Best Buy sold a ton of these so I felt compelled to make this my first helpful blog post.
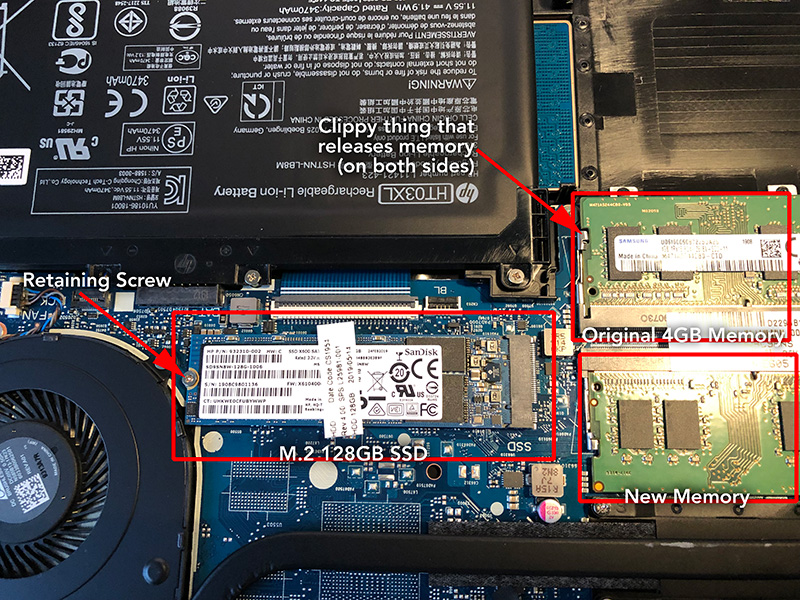
My HP came configured as 4GB RAM with128GB SSD. As you may know, 4GB RAM is a bare minimum and I’m a borderline power-user. But I fully expected to upgrade it easily.
Not so much…
After a little hunting I found this helpful video on YouTube demonstrating upgrading a similar model, an HP 14-df0013cl.
As you’ll see from the video, not only do you have to remove little screws, you must pry the case open. (YIKES.) The dude on the video managed so I thought… oh well… here goes… Fortunately my persistence was rewarded.
A key difference you should be aware of between the laptop in the video and a 14-cf0006dx: the 14-cf0006dx has 2 memory sockets, not just the one—which is great. One socket was empty and the other had a 4GB SO-DIMM, so I was able to snap in an 8GB memory module to bring it up to 12GB—the best $25 upgrade ever!
If you decide to remove the 4GB module, it shouldn’t be as difficult as the video depicts. You must open two springy pieces of metal simultaneously, then it’s easy to pop the memory out.
When you insert a new module, make sure it’s fully seated. You should barely be able to see the copper leads as they disappear into the socket and the springy claps should pop into place to hold the SO-DIMM firmly in place – fitting into the side notches in the circuit board. If you didn’t seat it correctly, you’ll know because the computer will not boot completely. BE SURE TO TEST BEFORE PUTTING THE CASE BACK TOGETHER! See Testing below.
I got my 8GB memory module at eBay for under $30.
I’d also recommend a pry tool instead of the guitar pick the video author uses. Pry tools are only $2 on iFixIt.com or you can buy a whole kit on Amazon for under $10.
The process was a little unnerving—you must be gentle yet firm with the case to pry it off. As in the video, turning my unit upside down when it was about 90% released made the lid pop off completely.
If you’re new to upgrading computers, it’s not that scary. Just make sure to discharge any static electricity before you touch the memory or the laptop innards.
Testing
Place the open computer right-side up, boot to Windows, open Settings (gear icon just to the right of Start Menu), click on “System”, and click on “About” at the bottom of the left menu bar. You’ll see the amount of memory installed. Hopefully you’re in good shape. If not, turn off the laptop and restart the memory. Rinse and repeat. Once the memory upgrade checks out, turn the laptop off before reassembling.